Harvestables
From Eternal Lands Wiki
|
- See also: Harvesting comparison table, Harvesting events
You can harvest an unlimited amount of items per in-game hour, but you will only receive experience for the first 120 harvests each hour (140 harvests per hour for those who have taken the Dedicated Harvester Perk or Smart Harvester perk; 160 if you have both. The counter for harvesting experience resets at the beginning of each hour, and you must be logged in during the change in the hour for your counter to be reset. If you exceed your maximum harvests in the current hour, you will receive the following notice in red text:
Your harvesting experience limit for this hour expired, you won't get any more harvesting EXP until the next hour.
Editor note: To add a location for a specific Harvestable, go to the Map page for the location you are adding, and list the coordinates next to the Harvestable on the Map page.
Harvestables
The lists here are sorted alphabetically. For a table of sortable statistics, see the Harvesting comparison table.
Plants
|
|
|
Ores
|
|
|
Minerals
|
|
Other
|
|
|
Hints
- Coordinates in bold ([xx,yy]) are closest to storage
- The time at the end of each line on the Map pages is the minimum time it takes to walk from the harvestable item to the closest storage. If the storage is on a different map, travelling information and links to the extra maps are provided inside parentheses: ( ).
- If nothing is listed after the time, then the storage is on the same map. You don't need to go through doors, caves, or to other maps.
- Listed times are achievable by all players, regardless of skills, items or perks. Times are measured by walking at the standard pace (no Potion of Speed Hax) and without casting magic, using rings, or typing
#beam me. Using teleportals shown on the official "Tab"-maps is acceptable unless the teleportal only works in one direction. - All measured times are rounded up to the next multiple of 5 seconds.
- A concise list of the best places (warning: spoilers) in the game is also available.
- On each failed harvest a food point is consumed, down to -30 food points, on higher level plants it can even go down to -40 food points. This is especially noticeable on higher level harvestables.
Quick List
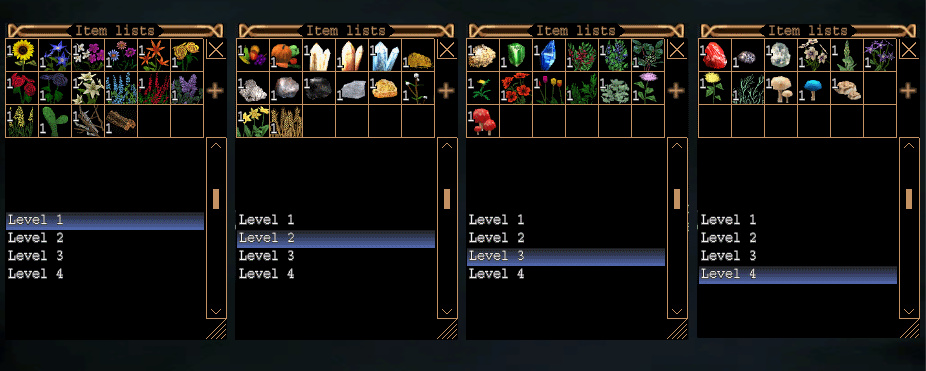
- The inventory list will help you to remember how fast an item is harvestable and to evaluate its value
- A level 2 harvestable will take twice as long to harvest than level 1
- A level 3 harvestable will take 50% longer to harvest than level 2
- A level 4 harvestable will take 33% longer to harvest than level 3
open file: item_lists.txt in your configuration folder
- copy/paste the data
- save the file
- right-click in your inventory list
- choose: Reload from file
Level 1 25 26 27 28 29 30 31 32 33 34 35 36 37 64 140 214 1 1 1 1 1 1 1 1 1 1 1 1 1 1 1 1 65535 65535 65535 65535 65535 65535 65535 65535 65535 65535 65535 65535 65535 65535 65535 65535 Level 2 1 2 38 40 39 42 43 45 46 289 297 303 304 320 1 1 1 1 1 1 1 1 1 1 1 1 1 1 65535 65535 65535 65535 65535 65535 65535 65535 65535 65535 65535 65535 65535 65535 Level 3 44 47 48 300 301 302 305 306 307 309 312 313 316 1 1 1 1 1 1 1 1 1 1 1 1 1 65535 65535 65535 65535 65535 65535 65535 65535 65535 65535 65535 65535 65535 Level 4 49 120 237 308 310 311 314 315 317 318 319 1 1 1 1 1 1 1 1 1 1 1 65535 65535 65535 65535 65535 65535 65535 65535 65535 65535 65535 |
Value
- See also: Complex items
|
|
|
|
|
|
|
